Appearance
Elasticsearch部署
1.1.elasticsearch单点部署
注意:
1)ES不允许使用root用户启动,所以安装部署启动都请使用普通用户。
2)高版本的ES(版本号为7.6.2)对jdk的最低要求1.8.0_191
1.1.1.传安装包至安装路径下

1.1.2.解压安装包
shell
unzip elasticsearch-7.6.2.zip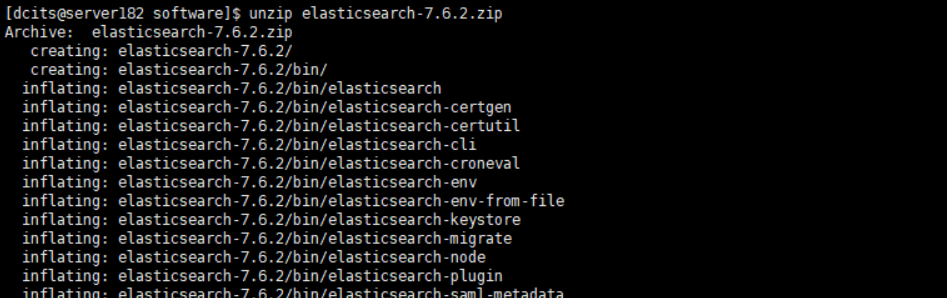
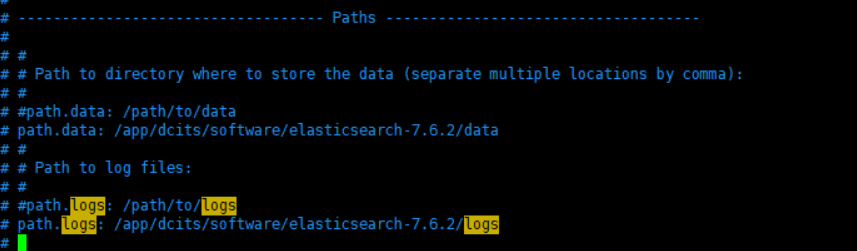
1.1.3.修改配置文件elasticsearch.yml
1)path.repo表示es的备份目录,修改备份目录为实际的路径目录,要与aries-log-center应用中配置的es备份路径(spring.data.elasticsearch.properties.path.home配置项)保持一致。
.png)
2)network.host表示es绑定的ip,绑定IP为es部署的物理IP地址,http.port为es端口。
.png)
注:在修改上面的配置项时“:” 冒号后面均有一个空格,不可缺少,否则该配置不生效。高版本的ES除了进行上述配置以外,还需要在bin目录修改elasticsearch-env文件添加如下图的配置项

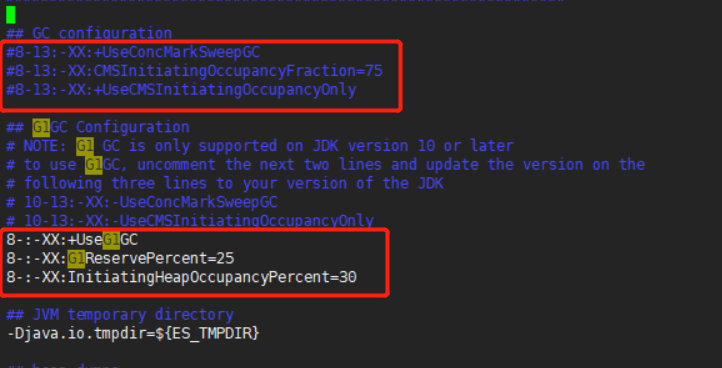
修改jvm.options中垃圾回收器算法。
1.1.4.es自身运行日志配置(可选)
进入es安装目录下的conf文件夹,打开log4j2.properties文件:
yaml
# 配置RollingFileappender
appender.rolling.type = RollingFile
appender.rolling.name = rolling
  # 日志名称 /var/log/elasticsearch/production.log
appender.rolling.fileName = ${sys:es.logs.base_path}${sys:file.separator}${sys:es.logs.cluster_name}.log
appender.rolling.layout.type = PatternLayout
appender.rolling.layout.pattern = [%d{ISO8601}][%-5p][%-25c{1.}] %marker%.-10000m%n
  # 滚动日志到/var/log/elasticsearch/production-yyyy-MM-dd-i.log; 日志将被压缩在每个滚动,i并将增加
appender.rolling.filePattern = ${sys:es.logs.base_path}${sys:file.separator}${sys:es.logs.cluster_name}-%d{yyyy-MM-dd}-%i.log.gz
appender.rolling.policies.type = Policies
  # 使用基于时间的滚动策略
appender.rolling.policies.time.type = TimeBasedTriggeringPolicy
  # 每天滚动日志
appender.rolling.policies.time.interval = 1
  # 在日边界上对齐滚动(而不是每24小时滚动一次)
appender.rolling.policies.time.modulate = true
  # 使用基于文件大小的滚动策略,比如文件到了100M
appender.rolling.policies.size.type = SizeBasedTriggeringPolicy
  # 文件大小在256 MB之后滚动日志
appender.rolling.policies.size.size = 256MB
appender.rolling.strategy.type = DefaultRolloverStrategy
appender.rolling.strategy.fileIndex = nomax
  # 滚动日志时使用删除操作
appender.rolling.strategy.action.type = Delete
appender.rolling.strategy.action.basepath = ${sys:es.logs.base_path}
  # 只删除匹配文件模式的日志
appender.rolling.strategy.action.condition.type = IfFileName
  # 模式是只删除主日志
appender.rolling.strategy.action.condition.glob = ${sys:es.logs.cluster_name}-*
  # 只有当我们累积了太多的压缩日志时才删除
appender.rolling.strategy.action.condition.nested_condition.type = IfAccumulatedFileSize
  # 压缩日志上的大小条件是2 GB
appender.rolling.strategy.action.condition.nested_condition.exceeds = 2GB如果要在指定的时间段内保留日志文件,则可以使用带有删除操作的滚动策略。
yaml
# 配置 DefaultRolloverStrategy
appender.rolling.strategy.type = DefaultRolloverStrategy
  # 配置Delete处理滚动的动作
appender.rolling.strategy.action.type = Delete
  # Elasticsearch日志的基本路径
appender.rolling.strategy.action.basepath = ${sys:es.logs.base_path}
  # 处理滚动时应用的条件
appender.rolling.strategy.action.condition.type = IfFileName
  # 从与glob匹配的基本路径中删除文件 ${sys:es.logs.cluster_name}-*; 这是日志文件滚动到的glob; 只需要删除滚动的Elasticsearch日志,而不是删除弃用和慢日志
appender.rolling.strategy.action.condition.glob = ${sys:es.logs.cluster_name}-*
  # 嵌套的条件适用于与glob匹配的文件
appender.rolling.strategy.action.condition.nested_condition.type = IfLastModified
  # 保留七天的日志
appender.rolling.strategy.action.condition.nested_condition.age = 7d还可以指定按照文件个数保留日志文件
yaml
#按照条件与glob匹配统计个数
appender.rolling_old.strategy.action.condition.nested_condition.type = IfAccumulatedFileCount
  #保留五个文件
appender.rolling_old.strategy.action.condition.nested_condition.exceeds = 51.1.5.es的授权
进入elasticsearch-2.4.4\bin目录,执行如下命令授权:
chmod 755 -R elasticsearch1.1.6.启动es
./elastcisearch -d1.1.7.校验服务
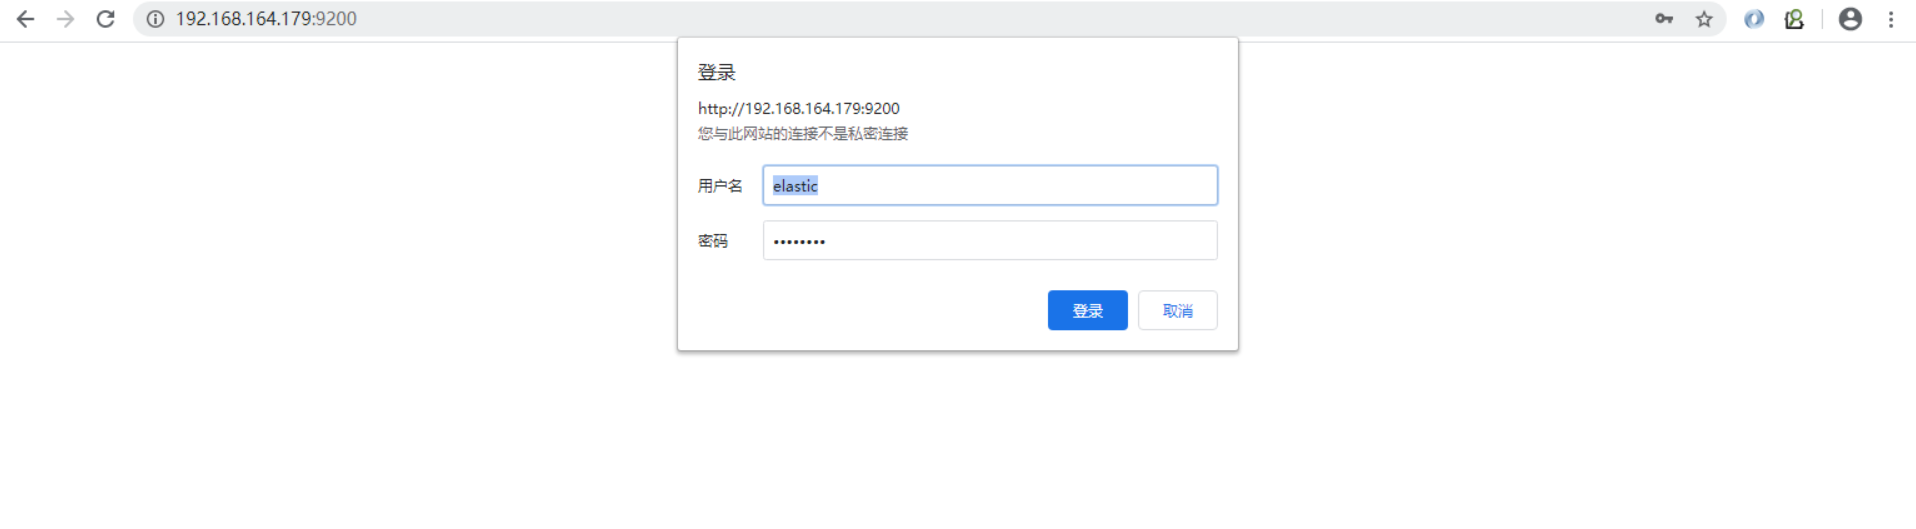
浏览器访问http://ip:9200,显示下图信息,说明ES已正常启动。

注意:如果es启动未成功,则需要分析es日志。
常见异常:
进入elasticsearch的logs文件夹,查看elasticsearch.log,出现下面的异常:

**解决办法:**以root用户登录安装elasticsearch的主机,执行如下修改:
① 编辑/etc/sysctl.conf,追加:
vm.max_map_count=655360保存后执行命令使修改生效:
sysctl -p② 然后编辑/etc/security/limits.conf,追加下内容后保存,退出root用户:
soft nofile 655360 hard nofile 655360注意:此文件修改后需要重新登录才可生效。
重新启动elasticsearch。
1.2.elasticsearch集群配置
在单点的基础上修改elasticsearch.yml文件如下:
建议生产部署三台节点,小型集群。全部设置主节点、数据节点即可:
yml
# 集群名称,一个集群下所有节点的名称必须一样
cluster.name: es_cluster
# 节点名称 每个节点的名字不能重复
node.name: node-179
#集群中主节点最少设置3个及以上
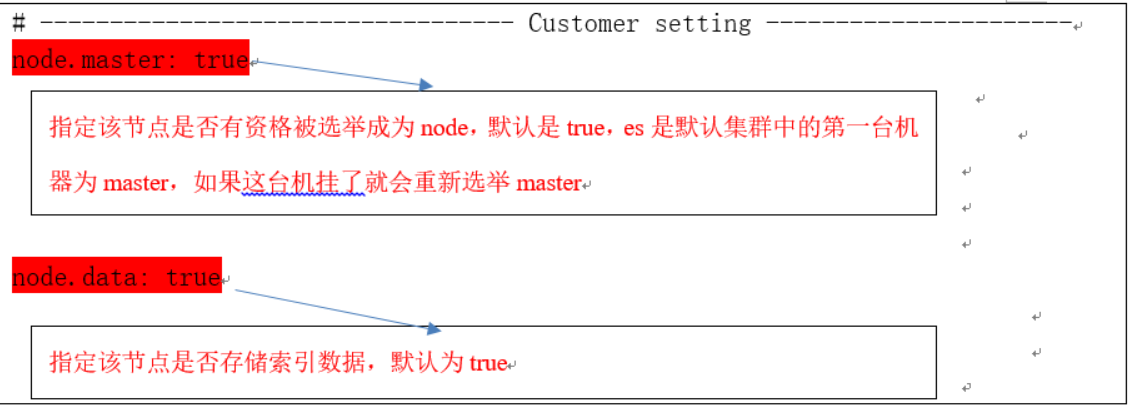
# 是否设置主节点,默认为true
node.master: true
# 是否允许节点存储数据,默认为true
node.data: true
# 为了避免脑裂,集群节点数最少为 半数(N/2)+1
discovery.zen.minimum_master_nodes: 2
# 如果不是候选主节点,则不需要配置此项
cluster.initial_master_nodes: [ "node-179", "node-180", "node-181" ]
#发现子系统的相关配置以便节点可以互相发现
#自动发现设置,配置之后集群的主机之间可以自动发现
discovery.seed_hosts: [ "192.168.164.179","192.168.164.180","192.168.164.181" ]
bootstrap.memory_lock: false
bootstrap.system_call_filter: false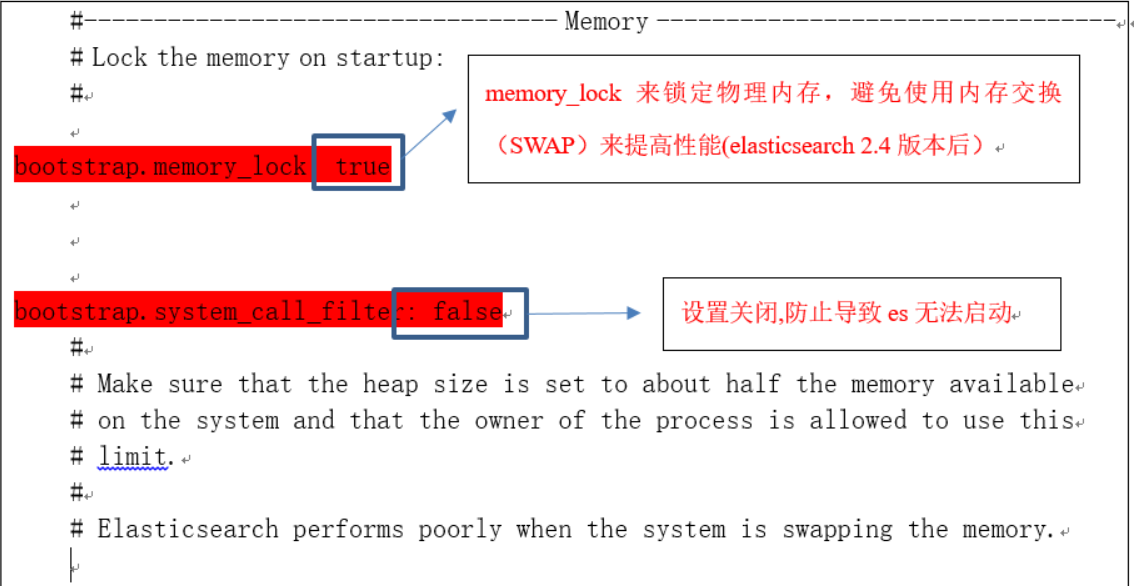
1.3.elasticsearch配置密码
1.3.1.在其中一个节点上生成认证文件
必须要生成认证文件,且ES配置文件里要引用这些生成的认证文件。
执行如下命令生成CA证书
shell
cd /app/dcits/software/elasticsearch-7.6.2/bin
./elasticsearch-certutil caPlease enter the desired output file [elastic-stack-ca.p12]: #这里直接回车即可
Enter password for elastic-stack-ca.p12 : #这里直接回车即可,不要设置密码
设置完毕后,会在/usr/local/elasticsearch-7.6.2下看到新生成的文件:
elastic-stack-ca.p12
使用第一步生成的证书,执行如下命令生成p12秘钥
shell
./elasticsearch-certutil cert --ca elastic-stack-ca.p12下面三项直接回车即可:
……
Enter password for CA (elastic-stack-ca.p12) :
Please enter the desired output file [elastic-certificates.p12]:
Enter password for elastic-certificates.p12 : #这里直接回车即可,不要设置密码,否则后面ES会启动不了
Certificates written to /usr/local/elasticsearch-7.6.2/elastic-certificates.p12
设置完毕后,会在/usr/local/elasticsearch-7.6.2下看到新生成的文件:
elastic-certificates.p12
1.3.2.将p12认证文件拷贝到其他节点上
拷贝elastic-certificates.p12文件到config目录下,同时拷贝到其他节点的config目录下。
同时在elasticsearch.yml文件中追加如下配置:
yaml
xpack.security.enabled: true
xpack.security.transport.ssl.enabled: true
xpack.security.transport.ssl.verification_mode: certificate
xpack.security.transport.ssl.keystore.path: elastic-certificates.p12
xpack.security.transport.ssl.truststore.path: elastic-certificates.p121.3.3.执行如下命令启动各个es节点
shell
./elasticsearch -d1.3.4.设置密码
#前提条件
想要成功设置密码的话,必须确保集群状态正常才行,否则密码设置会失败。
在其中一个节点上执行如下命令设置密码即可:
shell
./elasticsearch-setup-passwords interactive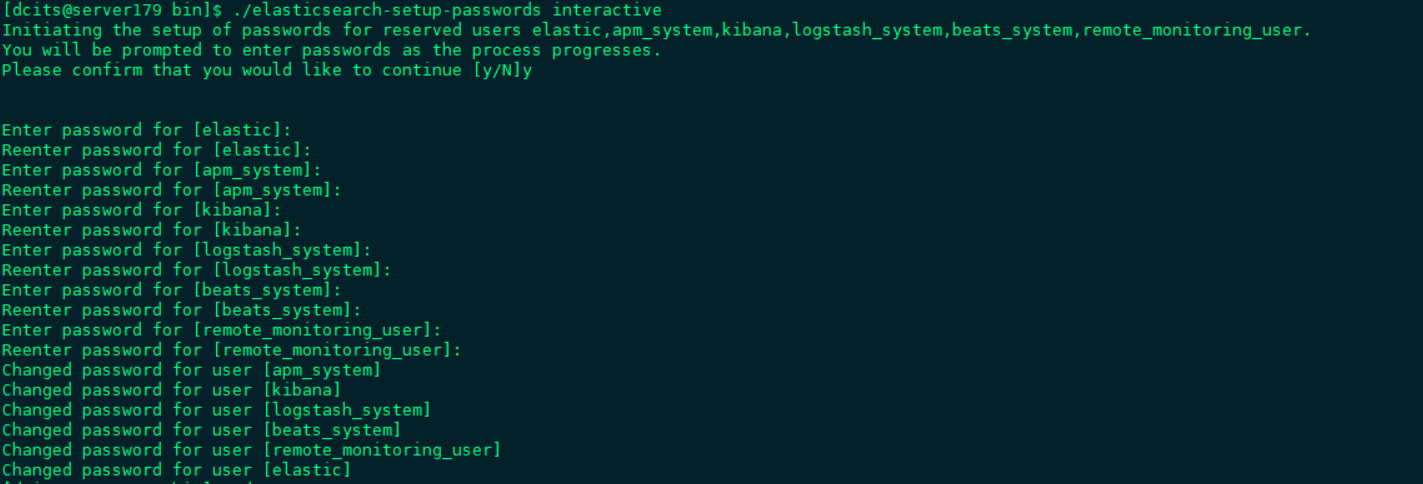
使用刚设置的密码登录es: